Smntx Tutorials
- Using the Smntx GUI: This guide includes an overview of the Smntx GUI and demonstrates how to start an NLP analysis, view the results, mine multiple documents and execute different queries.
- Accessing Smntx through Taverna: This document shows how scientific medical NLP workflows can be created using the Smntx REST interface and Taverna.
Using the Smntx GUI
- Site Layout:
The major aspects of the layout are as follows:
- Site Navigation bar: To assist users to switch between pages in the interface.
- Analysis Navigation panel: Allows users to view different analysis using either a tree view or a faceted search based view.
- Tree Navigation: Displays an expandable list of patient groups with links to individual analyses in each patient group
- Faceted Search Navigation: Displays an intuitive search based view of data from all analyses. Users can drill down using the difference search categories to explore their data.
- Status Bar: Shows logged in user etc.
- Search Bar: Generic search bar to search either raw input text or search over the analyzed fields.
- Page Content: Shows the run and summary pages
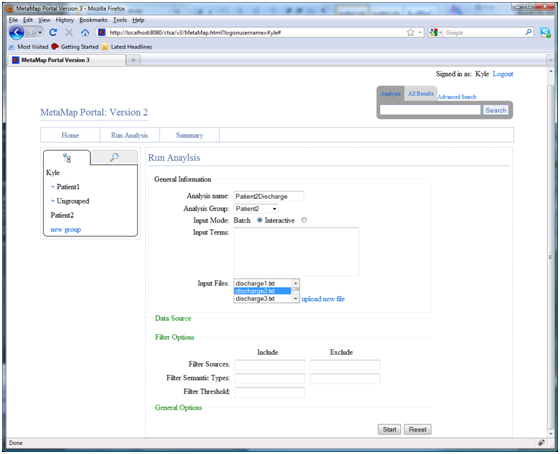
- Running a new analysis:
To start an NLP analysis of a medical document, select “Run Analysis” and configure the properties of the new analysis.
Users are required to name the analysis, choose a patient group (or ungrouped), and enter input terms or input files. The processing model: batch or interactive, can also be selected. In batch mode the analysis is launched asynchronously allowing control to be returned to the user so that they can perform other tasks while the analysis is executed. In interactive mode a popup will show the progress of the analysis while it executes.
Due to the complexity of MetaMap there are a number of options that can be specified when running a new analysis. All MetaMap command line options are displayed in the “General Options” section, individual options can be selected by clicking on the appropriate checkbox. In addition filters can be applied to sources, semantic types, and threshold score. Users are given the option of either including or excluding particular values for each of these filters.
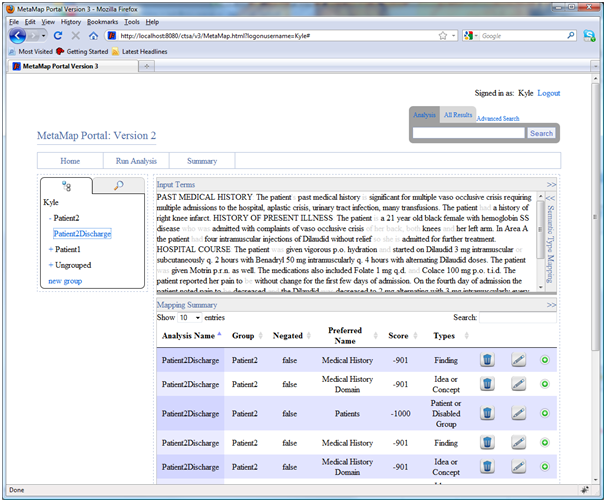
- Viewing completed analysis:
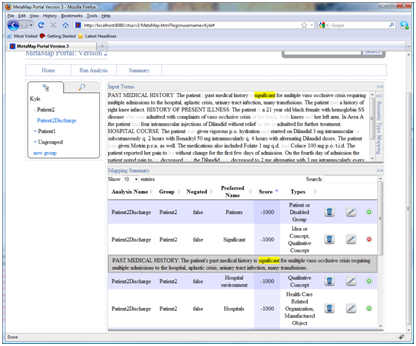
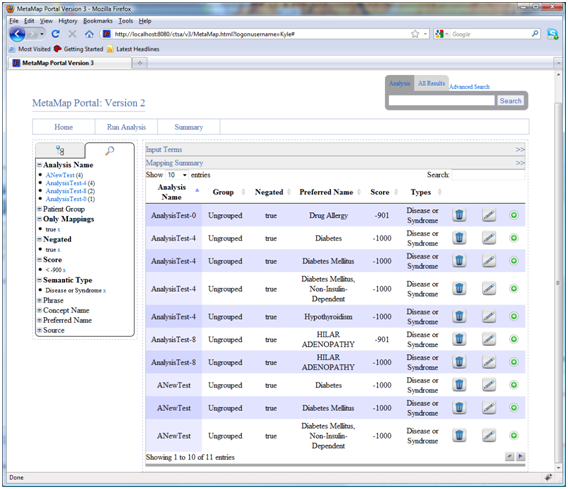
Selecting a previously executed analysis in the navigation pane will show the original input text and a summary of the MetaMap results in a table. The original input text is shown in the top pane (1) and a summary of the mappings and candidates matched by MetaMap is shown at the bottom (2). Both panes can be expanded and retracted to customize the viewing size.
The input terms pane includes a “semantic type mapping” insert to highlight semantic types in the text (3). Clicking on any term in the text will also filter the mappings displayed in the bottom pane to those related to the clicked on phrase.
Every row in the mapping table also allows users to view context of a particular mapping. When clicking on a row the phrase it appears in will be highlighted in the text. When viewing results from multiple analyses at once users can also view the context of a particular phrase by clicking on the “+” button (4). Expert users can delete and edit mappings by clicking on the appropriate garbage can and pencil icon respectively.
- Highlight semantic types:
The summary page provides the ability to highlight phrases in the input text according to user specified types. To do this expand the semantic type mapping insert and assign colours to individual semantic types. For example, to highlight all diseases or syndromes select diseases or syndromes from the drop down list and click the “+” link. All phrases that are classified as diseases or syndromes are now shown in blue in the text. Clicking on the color box allows customization of the markup color.

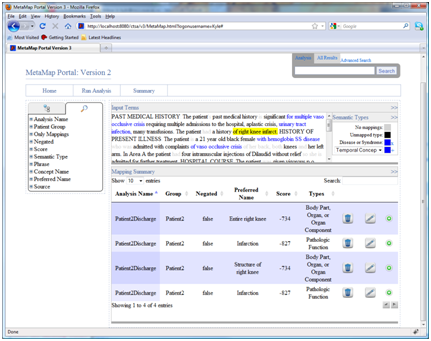
- Select an individual phrase:
Clicking on any phrase in the text will filter the MetaMap summary table for related mappings. For example clicking on “right knee infract” reduces the number of mappings displayed in the summary to the four mappings related only to that particular term. The same customization options are still available even in this filtered view.
- Viewing context for an individual mapping:
When viewing results for multiple analyses the terms pane is not shown. To view the context in which a phrase occurs users can click on the “+” button at the end of each row to view the previous and next sentence around the particular phrase. In addition the given phrase is highlighted in this context. The context can be retracted by clicking on the “-“ button.
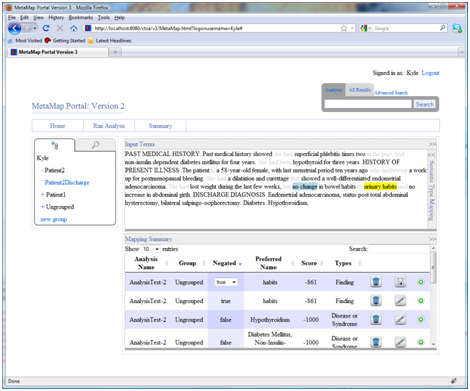
- Editing and deleting mappings:
Clicking on the garbage can icon will delete a mapping. Clicking on the pencil icon will make certain columns editable so users can alter mappings and then save changes. For example, in the following example urinary habits is marked as being negated, a user may wish to change this negation to false, they can do this by clicking on the edit button, changing the negated column from the options in the drop down box, and then clicking the save button.
- Highlight semantic types:
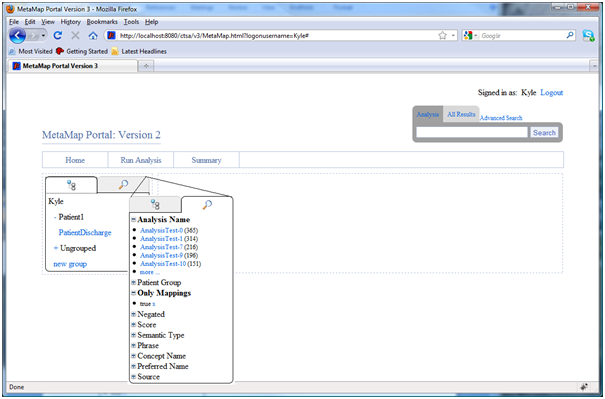
- Navigating by faceted search:
The facted search based navigation allows users to view results over all previously run analysis to look for trends and drill down into data. Each of the categories can be expanded to show a list of the most common results and the number of occurrences, if the list is too long users can expand and retract the list using the “more” and “less” links. Users can click on any of the results listed to filter results by that criteria (i.e it is transparently added to the current query), all other categories are updated to show the new results based on the filter. The filter can be removed by clicking the “x” link beside the chosen category.
For example the following search locates any mappings, score above 900, which are classified as diseases or syndromes and are negated.
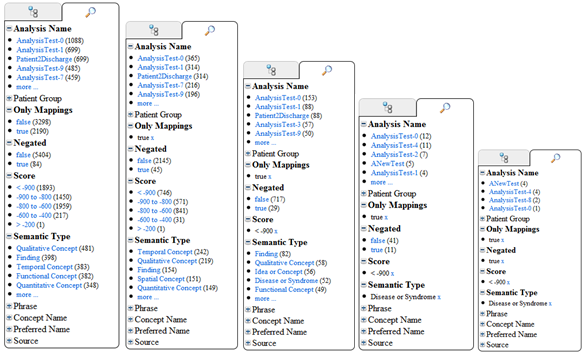
These queries result in the following 11 results being displayed in the summary.
- Searching:
The MetaMap API supports two types of search: firstly a full text search over raw input terms, secondly a full text search over the analyzed results.
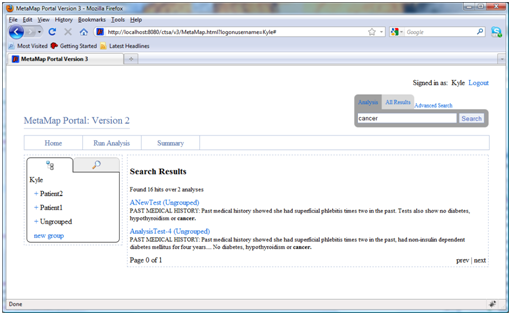
- Text search:
To conduct a search over all input terms simply enter a search term in the search bar and click “search”. The results are displayed in pages grouped by analysis name showing up to 5 matches per analysis. A short sentence in which each match occurs is also shown for context. Clicking on the analysis name will show a full summary of the input terms.
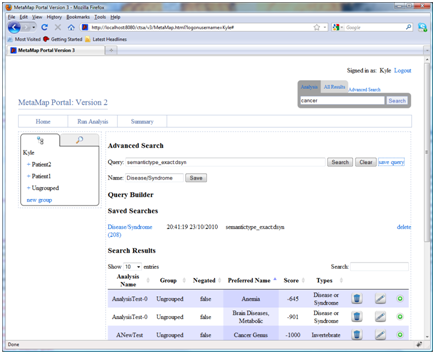
- Advanced analysis search:
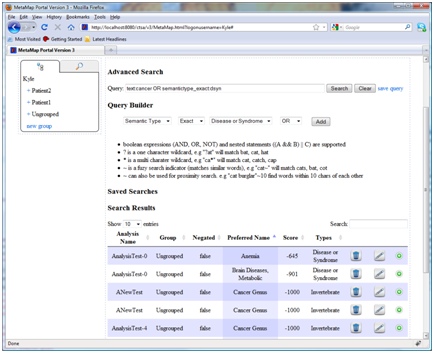
The advanced search page provides a means of constructing and executing complex queries over the entire data set. The query language supports Boolean operations (AND, OR, NOT) and nested composition. In addition wild cards, fuzzy search, and proximity query strings are also supported. To ease query development the advanced search page includes a query builder to add new conditions to the query. Results are shown in a table format as they related to individual analysis mappings. For example, by adding individual statements to the query it is easy to create a query that finds any reference to cancer or any mappings marked as disease or syndromes.
text:cancer OR semantictype_exact:dsynSearch language summary
- boolean expressions (AND, OR, NOT) and nested statements ((A && B) || C) are supported
- ? is a one character wildcard, e.g "?at" will match bat, cat, hat
- is a multi character wildcard, e.g "ca*" will match cat, catch, cap
- ~ is a fuzzy search indicator (matches similar words), e.g "cat~" will match cats, bat, cot
- ~ can also be used for proximity search. e.g "cat burglar"~10 find words within 10 chars of each other
- Text search:
- Saving and loading searches:
If a complex query is commonly used it may be useful to save the query and reuse it rather than rewriting it each time. Clicking the “save query” link will allow users to name and save a query. A list of previously saved queries (along with the number of results, date, and query) is shown in the saved search area. Clicking on the query name will re-execute the query. In addition users can delete saved searches if they are no longer useful.